Sunday, September 29, 2013

Guest Artist- Diana


Hi there my name is Diana Rivera of Arteypoemas.com and I'd like to show you how I made this mixed media art journal page. 


First, you're going to have to gesso your page.
After that, add a bit of acrylic paint. I used a spray bottle that I happen to have, with watered down acrylic paint. You can use watercolors as well, if you want to.

Then, get your stamps out. I used some fun day of the dead stamps, and blue pigment ink. 


I used the stamps to create a layer on the background. After that, I cut out a watercolor painting of mine. You can use a template online, trace it and color it in, if you're not confident in your drawing skills. 
Then, the butterfly is pasted on. 


After that, I added a bit of pen and ink, and stamped a beautiful butterfly on the page. 


And that's it! I hope you enjoyed my project today! 


Friday, September 27, 2013

Feature Friday:With Some Sparkle

Happy Friday everyone!  Erica here to share with you this weeks Feature Friday and I have chosen to feature the cling mount stamp set With Some Sparkle.  If you like glitter and shine then this stamp set is definitely for you!  It is great for all types of projects and today I am using it along with products from my stash and the Paper Wings Productions Shop.  This year is going by so quickly and soon I will need to start my journal for 2014!  So I pulled a blank journal I had in my stash and began to create my cover using this fabulous stamp set With Some Sparkle.  My journal had a great chipboard cover that was nice and thick and already had a hexagon pattern etched into it.  So I pulled out a handful of mists, inks and paint and went to town decorating my cover.  After I had a layer of color mists down I chose one of my glimmer mist and sprayed the whole cover to add some extra sparkle!  You can find a great selection of mists and inks the PWP shop HERE!  Next I took one of our great background stamps, inked it up with some black ink, stamped once on scrap paper and then again on my journal for a lighter effect.  I did this in a few random places on my journal.  Once that was done I grabbed a stencil and some white ink and created some circles, once again in random places.  We have some great STENCILS in our shop and they are just screaming your name!  If you are have never used them before they are a lot of fun!  Check out this great post from Norma using stencils  HERE.  Once my white ink was dry it was time to start stamping!  I stamped out the fabulous tiara image in the bottom left of my journal in black ink and added a rhinestone to the center of the tiara!


Next I stamped one of the great sayings in this stamp set on top of the circles I had just added to my journal cover! 


I love this saying and it is the perfect title for my 2014 journal!  I then took two more sentiments from the set and masked off the stamps leaving just the word SPARKLE and stamped them out on my cover! 


  I added a few embellishments some washi tape and outlined a few of the hexagons and colored some in with Gelatos from the PWP Shop.  Once I had everything down I took my white color mist and added a few droplets and called it done...well sort of.  I am sure as the time goes on things will slowly be added to my cover but for now this is my finished project!


Thanks so much for joining me today and as always I appreciate your comments very much!  Please visit us and share your creations using Paper Wings Productions products on our FACEBOOK page, PINTEREST, FLICKER GROUP and we are also on INSTAGRAM so tag us @paperwingsproductions and use #paperwingsproductions!

Wednesday, September 25, 2013

What's Up Wednesday - Fall Tag Books


Hi! Dana here today sharing a set of tag books that I created with the September Nesting Components Mixed Media Kit.


The larger images from the Clip Art Sheet fit perfectly onto the tags from the kit and made pretty, colorful covers for my books.


I added a stamped banner to the top of each book with the Banner Day Clear Stamp Set and the Hanging Stars Clear Stamp Set.


I added a small cluster of flowers and leaves to each tag. I tied the books together with a piece of multicolored seam binding.


I cut the pages for my tag books from manilla cardstock, that I aged with a wash made from Walnut Ink Crystals. I stamped the bottom of each page with an image from the Owl Panel Clear Stamp Set.


I added both color and texture to both the front and back covers of my books. I melted a layer of Fusible Webbing to each tag. I then added color with Golden Pumpkin Blush and Madonna Blue Robe Embossing Powders. I added another layer of shimmery color with a peach colored mist.

If you're looking for more inspiration for fall projects or the upcoming Halloween holiday, you won't want to miss these posts:

Norma's You Are Special Hanging
Erica's Halloween Favors
Amber's Mini Halloween Card Set
Cathi's Fall Candle Tutorial
Shay's Golden Leaves Card Set
Irit's Every Little Thing Mixed Media Piece

We would love to see what you make with Paper Wings Productions stamps! Add your projects to our Facebook page, our flickr group, to Pinterest, comment with a link on this post or even email pictures to us! You can pick up the September Nesting Components Mixed Media Kit from the Paper Wings Productions Store while supplies last. Check out the selection of NEW stamps HERE.

Thanks for stopping by today!


Monday, September 23, 2013

You Are Special

Hi everyone and Welcome to Mixed Media Monday!!


Norma here and today I'm working with the Sept. Nesting Components kit along with the NEW Dragonfly Fairy and Fringe Lace stamp set.


I found these great canvas mini albums on clearance at Michaels the other day and each page was actually covered with canvas.  So the way this project started out is while I was working on another project that required spray ink, I ended up with a lot of extra ink.  You know in the box that I was spraying in, so I grabbed one of the album pages to soak up all that extra Lindy's ink.  See, nothing goes to waste around here, lol.  


Next I stamped the NEW Fringe Lace stamp along the bottom just to add another layer of subtle detail to my design.


Now going back to not wasting anything, I used the Prima packaging from the Sept kit on my background.  Then I layered the beautiful Prima flowers and some of the feathers on the Sept kit's clip art sheet.  My Dragonfly Fairy was stamped on white cardstock, fussy cut and colored with Prismacolor pencils.  I also added a second layer of Stickles covered vellum wings to the dragonfly.  I worked in the floral spray from the owl panel set and the sentiment is from the Dragonfly Fairy set.


I split the velvet rick rack in half and created a bow using both halves.  Then I tucked in an old key and with that I was done!!  I've actually been able to create four Autumn themed projects with this month's Nesting Components kit


So have you picked up your kit yet?!  This is a great kit and there are so many beautiful PWP stamps that you incorporate into your Autumn themed projects.  If you haven't visited the online store lately, then I encourage you do so.  My talented design team sisters have been creating their own magic with this kit too, take a look!  


Check out the wonderful custom candle tutorial that Cathi shared HERE and her gorgeous layout HERE.


Last but certainly not least, Dana dazzled us with these two stunning creations.  For Dana's fusible webbing tutorial click HERE and for her beautiful banner click HERE.

Thanks so much for spending a little bit of your day with us!!  I hope we've inspired you to start creating your own autumn masterpieces with this month's kit!!  Have a Beautiful Day!!!


Saturday, September 21, 2013

Scrapbook Saturday : By the Sea


Hello my dear crafty friends and welcome to my Scrapbooking Saturday!


Irit is here and this is my first scrapbooking page made with our gorgeous PWP stamps and sure not the last!
So this is my so called " Clean and Simple" page: a lot of white space with light Mixed Media coverage and not too much patterned paper after all.


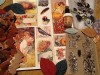
I used my dear grandsons photo cut out (the background was not a good fit for the colors , so you can cut the image out and to arrange it as you wish over the background cluster.
I used some, not much, LYB paper, stickers and die cuts and mostly made then random background strips. I also added some old and forgotten plastic self adhesive mesh in two colors.Then I added three cut outs form PWP gorgeous 
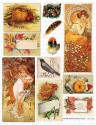
By the Sea  clip art sheets: Post card, Boats and even some shells, but those are  not much seen after the title added over.
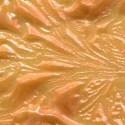
And then stamped the rest of the background. And I stamped a lot.
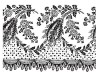
You can see background stamping all over the centre of my page made with Punchinella set and Textures set.
Then I added kind of waves using Journaling  set scalloped border . More spots   were stamped down to the lower left corner with  Textures set. And some faux stitching in red with another stamp from Journaling set.
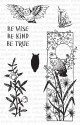
Next I stamped some birds using Bird Panel set on the upper part. And even added a sun from Build a Scene set.

Here is a closer look to the cluster center and our lovely clip art.


Now is was journaling time and I used this Journaling set to make my stamped journaling over LYB spots.
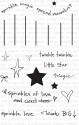
Then I added  some more word stamps on the lower corner cluster, using THIS AND THAT  and MEMORIES stamps.
 And as I always try to add some  never used products, I added a lot of gold micro beads to simulate to sand.
I really like the outcome of this page and hope you like it too.
See you soon with more PWP  inspiration!


Related Posts Plugin for WordPress, Blogger...