Tuesday, April 30, 2013

Technique Tuesday - Alcohol Ink resist


Hi there Peeps-

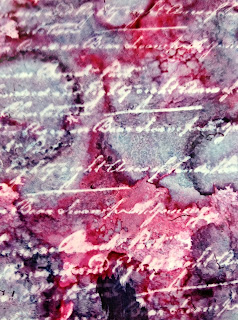
I hope you are having a good week so far.  Today I am going to share a great technique I learned from Tim Holtz ages ago and recently revisited for an alcohol ink class I had recently.  This a is technique that essentially removes the alcohol ink from a transparency.  (the circular image in the background on the sample below)

I started with a piece of transparency film (acetate), a couple of colors of alcohol ink, a blending tool with a felt pad, alcohol ink blending solution, craft mat, any color of Archival Ink pad, rubber stamps, and paper towels.  

I dropped small amounts of both colors onto the transparency.

Then used the blending tool to smear the ink around.  I like to use short twisty movements.


 Add a small amount of blending solution to the felt pad to get the ink to blend and move around.

I have found that this technique only works with permanent dye based ink pads such as Archival Ink from Ranger.

Stamp across the acetate as desired.


Let the ink set for a couple of minutes then buff the surface of the acetate with a paper towel.  

Rubbing will remove the stamped ink.

 Look at the possibilities!


On this one, I stamped the opposite side of the transparency with Staz On ink and added a ribbon.


Have you ever tried this technique?  It's a favorite of mine.  I hope you will share what you make with our stamps.  

Enjoy the flight,
Carrie


Friday, April 26, 2013

Feature Friday - Paris Snowglobe

TGIF! Dana here today sharing a project I created with the April Mixed Media Kit. I know many of you are still battling Winter, so keeping that in mind, I thought it would be fun to share my Paris themed snow globe I put together with the supplies from the kit.


I love map prints and was thrilled to find one included on the clip art sheet from the kit! It made a nice backdrop for my little scene, a cloud rub-on and the Eiffel Tower from the Royal Melange Set.

I wrapped the base of my globe with the beautiful piece of velvet ribbon from the kit. I actually adhered the ribbon velvet side down as I liked the pretty lace with just a hint of color peeking through. I finished this piece by adding a small crown charm, which is also included in the kit!

A gentle shake of the globe sets loose a flurry of pretty glitter.  For those of you who are still dealing with real snow, hang in there! You can pick up the April Mixed Media Kit from the Paper Wings Productions Store and create inside where it is nice and warm.

Thanks so much for stopping by today!


Wednesday, April 24, 2013

Googly Eyed Fish For A Birthday Boy


Hello everyone it's Amber here with another What's Up Wednesday post. Today I am sharing this cute little Birthday Boy card featuring the Mermaid Clear Stamp Set.


I just love this little fish image that is with the Mermaid Clear Stamp Set. When I seen it I thought the little fish would be really cute repeatedly stamped. So I pulled out some white cardstock and started stamping. Once  I had my fish stamped I colored them, added some glitter, added some mini googly eyes, and  then cut the white cardstock to fit my card base. Since I colored the fish blue and green I thought the colors were perfect for a boys birthday card. You can see a close up below as well as my supply list.


We would love to see what you make with Paper Wings Productions Stamps so add your projects to our Flickr Group, to Pinterest, or leave a comment with a link to your project. Thanks for visiting today!
Supplies: Cardstock- White, Blue, Light Blue, Green / Paper Wings Productions Clear Stamp Set- Mermaid / Staz-On Ink Pad- Jet Black / SRM Clear Sticker- Birthday Boy / CTMH Markers / Rangers Stickles- Lime Green / Mini Googly Eyes / Sulky Thread- Black / Sewing Machine

Monday, April 22, 2013

Altered Train Case - April In Paris Mixed Media Kit

Happy Monday Everyone!  Did you have a great weekend?  Well I hope you did!  Today is one of my very favorite days, Mixed Media Monday!!


I've been so excited about each and every kit that Carrie has put together and this month's kit is no exception.  These kits offer such a gorgeous assortment of items and I just loved what Dana did with it last week.  If you missed her post, you can check it out HERE.  Today I'm sharing my spin  on this gorgeous kit!


I've had this vintage case that I picked up at a local antiques mall for awhile now.  I knew that I wanted to refinish it but really had no idea how, until I saw April's Mixed Media kit.


This is what it looked like before.  I peeled off the alligator paper and sanded the box down.


Next I applied a layer of gesso and then a layer of fluid acrylic paint.


Once the paint was dry, I just went to town stamping.  I literally used every single stamp in the Royal Melange stamp set included in the kit.  After I was done stamping, I gave the case a light white wash with the Tim Holtz Distress Stain from the March Mixed Media kit.


To create this collage, I used a combination of items from the March and April Mixed Media Kits. I used a library card and some book text from the March kit, images from the April kit and the Faber Castell gel medium to adhere them to the case.  I created additional texture with the Mr. Huey stencil and molding paste.


I combined the key trim from the March kit with the beautiful May Arts ribbon in the April kit.  To create the king charm, I added a layer of book text from the March kit to an unfinished wood charm and stamped the king.  Then I applied a layer of the Faber Castell glaze for some shine.  To alter the crown charm included in the April kit, I painted it with the Faber Castell gesso then applied a layer of fluid acrylic in Raw Umber, rubbing the excess off of the raised parts.  The rest of the beads are from my stash.


To finish off the case I rubbed a little of the Raw Umber fluid acrylic to all of the edges.


All of the sides received the same treatments as the front.


This beautiful kit made altering this vintage case so easy and it blended so well with March kit.  To get a closer look at the April kit, please visit the PWP Online Store and I think you might still be able to pick up the March Mixed Media kit too (but don't quote me on that).  


Well I hope Dana and I have inspired you to get creative with these gorgeous Mixed Media kits!  Feel free to share pics of your PWP projects with us on Facebook, we'd love to see what you're creating!!  Have a Wonderful week and THANKS for joining me today!!


Thursday, April 18, 2013

Themed Thursday - Texture and the April Mixed Media Kit


Hi PWP fans! Dana here today with you sharing a themed post all about texture and the fabulous April Mixed Media Kit. The mask, rub-ons, clip art, Textural Accents and Paper Wings Productions Stamps found in the kit make adding layers of texture to your projects easy and fun!


If you'd like a closer look at the April Kit, Carrie put together a great video showcasing the contents, which feature a Paris theme. You can find the video HERE.


The kit comes with blank artist trading cards, which is a great size to experiment with new techniques and mediums. I started this card by covering it with a pretty patterned paper and one of the clip art photos from the kit. I then added some cloud rub-ons to the photo and a postal stamp from the Royal Melange Set to the top right-hand corner of the card. Both of these items are included in the kit!The "Paris" stamp is part of the Paris Clear Stamp Set.


I mixed some ink into the Gel Medium from the Textural Accents Set to create the rich brown color and spread it over the Huey's Circles Mask to add a textured pattern to the card. I highlighted the Eiffel Tower with some Star Dust Stickles (also in the kit!) to finish the card.


I started this second ATC the same as the first, with patterned paper and an image from the clip art sheet. I then added several layers of clear embossing powder


While the final layer of embossing powder was still hot, I pressed two stamps from the Royal Melange Stamp Set into the powder. To keep the stamps from sticking to the card, coat them with watermark ink before you press them into the melted powder. 


I chilled the card in the freezer for a couple of minutes and then bent the card in several places to crack the surface. I mixed Glaze from the Textural Accents Set with some brown ink and brushed it over the surface of the card to highlight the stamped impressions and cracks and to give the card an aged look.

Thanks so much for stopping by today! I hope I have inspired you! You can pick up the April Mixed Media Kit from the Paper Wings Productions Store. There are also a couple March Mixed Media Kits available! If you missed Tara's Technique Tuesday post from this week, scroll down to learn how to add texture to your projects using a crayon resist!

We would love to see what you make with Paper Wings Productions Stamps! Add your projects to our Flickr Group, to Pinterest, to our facebook page or leave a comment on any blog post with a link to your project.


Related Posts Plugin for WordPress, Blogger...